Multi-User
Use the steps below to set up your multi-user system.
If you do not understand these directions, then you need a computer technician
to share the computers on your network properly!
NOTE: If your system is using the McAfee™
antivirus software, share the ACR folder ONLY and turn off Protective
Sharing for Vista, Windows 7 and Windows 8.
Server Setup
- Windows 10 Server
- Start off by sharing the ACR Folder.
- Call Technical Support to turn the Multi-User feature on. This feature is an additional cost.
- Right-click on the ACR folder located in the C: drive, Open the properties window.
- Select the Sharing tab and click on the "Share" button.

- In the window that opens up, add an entry for “Everyone,” “Network,” and if it does not already exist “Users.”
- Set each of those users to have Read/Write permissions

- When complete, Click on the "Share" button again.
- Close out of the properties window by clicking OK.
- Next you have to configure the network share settings through windows.
- Start by opening up the control Panel
1: Right click the start button.
2: Select Control Panel from the list.
- In the top right corner of the control panel, click the dropdown labeled “Category” and select “Small” or “Large icons” from the list.
- Open up the NETWORK SHARING CENTER

- Open up the dropdown for "All Networks"
- Set the following three settings.
1: public folder--Turn on
2: File sharing connections--Enable File sharing for 40/56bit encryption
3: Password Protected Sharing--Turn off

- Click on Save changes. Once Complete, and test
- Lastly, the power settings for the computer's hard drive need to be adjusted.
- Through the control panel, open up the Power Option

- Set your power settings to High Preformance
1: You may have to click the dropdown for Hide additional plans to reveal it.
- Click on the Change plan Settings button along the right

- In the Edit Plan Settings window, click on Change Advanced power settings
- in the Power Settings window that opens up, drop down the options for Hard Disk and Turn off hard disk after
- Set the time (Minutes) to 0(Zero)

- Once complete click on the OK button along the bottom of the window.
- Click on the Save Changes Button back on the Edit Plan Settings window, and close out of the control panel.
- Windows 8 / 8.1 / Server 2012
- If this is a brand new setup, install the software.
- Call Technical Support to turn the Multi-User feature on. This feature is an additional cost.
- Share the drive you are installing the software on with full access.
- Right-click on the Windows desktop and select Personalize.
- Click the Screen Saver icon.
- Under Power Management, click Change Power Settings.
- Select High Performance.
- Click Change Plan Settings.
- Set the computer to sleep Never. The
Turn of Display can be set to what you want.
- Click Change Advanced Power Settings.
- Expand Hard Disk and expand Turn Off Hard Disk After. Set to
Never.

- Expand Sleep and set Sleep After and Hibernate After to
Never.
- Apply and then OK twice.

- Server Setup - Drive Sharing/Security
- Right-click network icon located on the taskbar on the
bottom right of the screen. Next to the clock.

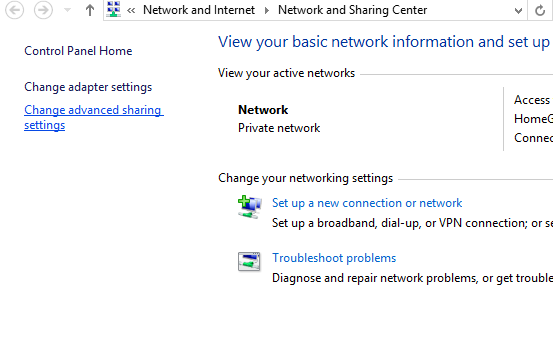
- Go to Open Network and Sharing Center.
- Click Change Advanced Sharing Settings.
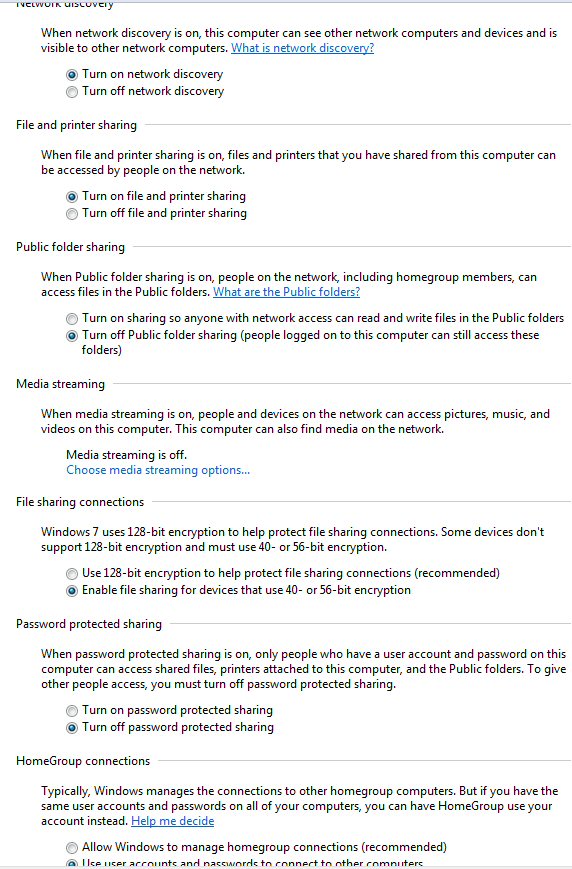
- Make changes according to picture below.


- Click Save Changes.
- Close all dialog boxes.
- Click the File Folder icon.

- Right-click on the drive where the software is installed and
select Properties.
- Select the Share With and Advanced Sharing.
- Select Advanced Sharing
button.
- Check Share this folder.

- Click Permissions. Highlight the user Everyone.
- Check the box for Full
Control in the Allow column.
- Click Add, type in Network and click OK.
- Highlight the user Network and check the box for Full
Control in the Allow column.

- Click OK.
- Click the Security tab.
- Click the Edit button.
- If Everyone is not listed under Group or user names, add it
and check Full Control.
- Add NETWORK and check Full Control.
- Click OK twice.
- Windows 7 / Server 2008 R2
- If this is a brand new setup, install the software.
- Call Technical Support to turn the Multi-User feature on. This feature is an additional cost.
- Share the drive you are installing the software on with full access.
- Right-click on the Windows desktop and select Personalize.
- Click the screensaver icon.
- Select Change Power Settings.
- Under Power Management, click High Performance.
- Click Change Plan Settings.
- Set the computer to sleep Never. The
Turn of Display can be set to what you want.
- Click Change Advanced Power Settings.
- Expand Hard Disk and expand Turn Off Hard Disk After. Set to
Never.

- Expand Sleep and set Sleep After and Hibernate After to
Never.
- Apply and then OK.

- Close all open dialog boxes.
- Server Setup - Drive Sharing/Security
- On Windows, click Start and go to Control Panel.
- Under Network and Internet, click View
network status and tasks.
- Click Change Advanced Sharing Settings.
-
Make your settings match the below
screenshot:

- Click Save Changes and restart computer.
- Click Start and then Computer.
- Right-click on the drive where the software is installed and
select Properties.
- Select the Sharing tab. Click the Advanced Sharing button.
- Check Share this folder.

- Click Permissions. Highlight the user Everyone.
- Check the box for Full
Control in the Allow column.
- Click Add, type in Network and click OK.
- Highlight the user Network and check the box for
Full
Control in the Allow column.

- Click Apply and then OK.
- Click OK.
- Click the Security tab.
- Click the Edit button.
- If Everyone is not listed under Group or user names, add it
and check Full Control.
- Add NETWORK and check Full Control.
- Click Apply and then OK.

- Vista / Server 2008
- If this is a brand new setup, install the software.
- Call Technical Support to turn the
Multi-User feature on. This feature is an
additional cost.
- Right-click on the Windows desktop and
select Personalize.
- Click the screensaver icon.
- Under Power Management, click Change Power
Settings.
- Click Change Plan Settings.
- Click Change Advanced Power Settings.
- Expand Hard Disk and expand Turn Off Hard
Disk After. Set to Never.

- Expand Sleep and set Sleep After and
Hibernate After to Never.
- Click Apply and then OK.
- Close dialog box.
- Click OK on Screen Saver Settings.
- Close down dialog box.
- Server Setup - Drive Sharing/Security
- Share the drive you are installing the
software on with full access.
- Click Start and go to Control Panel.
- Under Network and Internet, select Set Up File Sharing.
- Make sure Network Discovery is set to On.
- File Sharing is set to ON.
- Password Protected Sharing is set to Off.
- Restart computer.
- Click Start and then Computer.
- Right-click on the drive where the software is installed and
select Share.
- Select the Sharing tab.
- Click the Advanced Sharing button.
- Check Share this folder.
- Click Permissions. Highlight the Group or user name
Everyone.
- Under Permissions for Everyone, select Allow for Full
Control, Change and Read.
- Click OK. Click OK again.
- Click the Security tab.
- Click the Edit button.
- If Everyone is not listed under Group or user names, add it
and check Full Control.
- Add NETWORK and check Full Control.
- Click OK and then Close.
Client Setup
-
Install software.
Double-click on program's icon on your desktop.
Click This is a CLIENT work-station.

-
If your server
has not been set up, click
No and refer to the
server setup
section.
-
If your server
has been set up (sharing and security), click
Yes.

-
Select your
server name from the list of computers.
If the server name does not display in the list,
you need a computer technician to share the computers on your network properly!

-
The program will automatically try to locate the directory where the
software is installed on your server. Once it is found, click NO to map a
drive.
-
Click Save Settings and Launch SMS.


